Friday, November 5, 2010

Thai Basil Chicken or Gai Pad Gra Pow


This is a family favorite. We like to cook it at least once a month at our house (preferably much more often!). Originally, this recipe came from Thaitable. We modify their recipe slightly.

YOU NEED:

2 TBS Vegetable Oil
4 - 7 Thai chili peppers, minced
1 TBS sugar
1 - 2 packages fresh Thai basil
1/2 lb chicken, minced
1 TBS garlic, minced
1 carrot, thinly sliced
a wok is preferable for cooking this dish
Jasmine rice

For sauce:
juice of 1 lemon
equivalent amount of fish sauce
4 or 5 minced Thai chili peppers


We modify the above in the following way: we usually double everything! While this is not true modification so far, we also typically add a bit more garlic than is called for, more Thai chili peppers (at least 10), and 1 - 2 TBS oyster sauce. Occasionally, we add 1 - 3 sliced Asian eggplants right before we add the chicken. We also add a Thai basil curry paste to the ground chicken and let it marinate a few minutes.

PREP

Make your sauce by mixing sauce ingredients above in a small bowl. Set aside.

Mince the garlic and chili pepper. Put in a small bowl together or separate. Set aside.

Thinly slice your carrot (and eggplant, if using) and place in a large bowl. Set aside.

Clean and pick your basil leaves. Pile onto a plate. Set aside.

Measure your sugar, fish sauce, and oyster sauce if using into a small bowl and set aside.

Mince your chicken.

Ingredients should be assembled. We add eggplant to ours as well (if you do this, add it before the chicken and stir a few minutes.)

COOKING!

Fry garlic and chili pepper in oil over high heat.

When garlic begins to brown, add eggplant (if using) and carrot. Stir-fry eggplant a few minutes until softens (add more oil as needed). If only using carrot, proceed immediately to the next step.

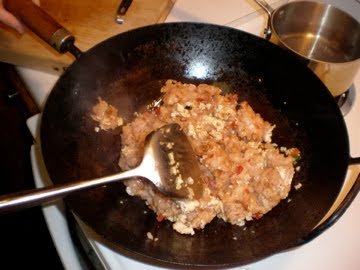
Drop chicken in and stir constantly. Keep stirring until all juice is out of chicken and chicken is cooked.

Add sugar, fish sauce, and oyster sauce. Stir fry for a few seconds.

Add Thai basil. Turn it over in the wok to mix through the dish. It will wilt and smell wonderful.

Plate over jasmine rice. Serve with lemon-fish sauce and enjoy!

PICS of the Cooking Process:


Tuesday, October 19, 2010

Bi Bim Bap


Yes, it's been since June since the last post! I'll be trying to blog regularly from now on since those first three months of pregnancy are over and the nausea has subsided enough for me to return to the kitchen.

I wanted to post about my favorite Korean dish - Bi Bim Bap. Bi Bim Bap is frequently served in a hot stone bowl, in which case it would be called Dol Sot Bi Bim Bap.

It's an extremely nutritious dish - full of vegetables, with anchovies and egg as protein, served over rice. Most people eat it with a semi-sweet, slightly spicy, red pepper paste.

I'm giving the recipe for our easy home-made version. You will find many variants of this recipe, since Bi Bim Bap can really be made with a variety of vegetables, depending on your preference and what is in your fridge. In that way, it can be economical and a great way to use up raw vegetables while they are still fresh. And since this recipe is so centered around vegetables, they need to be the freshest!

Our basic recipe for two calls for:

3 or 4 carrots, julienned
One package small mushrooms (baby bellas cut into fourths or enoki mushrooms are good choices)
1 package spinach, washed
2 cups jasmine rice
myulchi bokkeum (stir-fried dried anchovies)
Korean red pepper paste
1/2 Cup soy sauce
2 Tbs Sesame oil
2 or 3 Pinches Sesame seeds
One package sliced green onion
2 eggs

For Myulchi Bokkeum (thank you, Maangchi!):
1 cup dried anchovies, 1 tbs olive oi, 1 or 2 tbs sugar, 1/2 tsp minced garlic, 2 tsp water, and 1/2 tbs corn syrup (Optional. We use canola oil instead and it turns out great!). Follow recipe through the link above - it's very easy and delicious.

1. First, put your rice on to steam in your rice cooker or pan.
2. Mix soy sauce, sesame oil, and sesame seeds in a small bowl. Add 3 tablespoons of chopped green onion. Set aside.
3. Make myulchi bokkeum, following Maanchi's recipe above.
4. Blanch your vegetables one at a time: carrots, spinach, and mushrooms. (You can also fry your mushrooms for a few minutes in 1 or 2 tbs sesame oil for stronger flavor).
5. Arrange blanched vegetables on a plate along with the extra sliced green onion.
6. Sprinkle some sesame seeds over your mushrooms. Drizzle vegetables with a small amount of sesame oil if you like.
7. Fry two eggs (we use the same pan used for the mushrooms without washing it first).
8. Fill your bowls with rice. Arrange your bi bim bap as desired - the vegetables go on top of the rice, spoon a little of the soy sauce blend over the veggies, and top each bowl with your fried egg. You can either mix your anchovies into the dish or eat them on the side. Add Korean red pepper paste to taste throughout the meal.
Enjoy!

Wednesday, June 23, 2010

Garam Masala


Prepping for last post's Korma, John and I made garam masala ourselves. You can purchase garam masala in the store pre-ground, but it usually has nowhere near the pungency you can create by making your own. In fact, when we smelled our finished masala, the difference was so great that we just dumped our store-bought spice.

I think garam masala is very fun to make - it is visually appealing, with all of your spices laid out to roast, and the aromas of the roasting spices are delicious. John ground the roasted spices in the mortar and pestle and then we mixed in a pinch of saffron.

There are different versions of garam masala, but most include the following basic spices. Sometimes recipes call for saffron or rose petals. Our recipe called for saffron.

Here are the ingredients you need:

2 tablespoons cumin seeds
2 tablespoons coriander seeds
2 tablespoons cardamom seeds
2 tablespoons black peppercorns
1 (3-inch) stick cinnamon, broken up
1 teaspoon whole cloves
1 teaspoon grated nutmeg
1/2 teaspoon saffron (optional)

Now, toast all of the spices except for the nutmeg and saffron. Do this by putting them into a dry, heavy skillet (we used cast iron) set on medium-high heat. Be careful and watch the spices. They should give off a slight smoke as they roast and the aroma will be sweet and spicy. If you burn them at all, you will need to start completely over. The flavors will be full-bodied after about 10 minutes of toasting, with some variance depending on the type of stove you are using.


After the spices are toasted, grind them to a powder along with the nutmeg and saffron in either a spice grinder, or, as we used, a mortar and pestle.


It should keep from 3 - 4 months in a tightly-sealed container away from heat and light.


The spice on the right is the garam masala; the spice on the left is turmeric.

Posted by Sara.

Tuesday, June 15, 2010

Chicken Korma with Saffron Rice


If you have been checking this blog for updates, you may have noticed that not much has been cooking lately. This is more a reflection of my laziness with respect to blogging than actual inactivity in the kitchen. We have been cooking more simple meals lately, such as vegetables with vegetables...nothing particularly photogenic.

So, moving on to today's recipe: Chicken Korma. I have still not been able to reproduce exactly the taste of this dish at our favorite Indian restaurant, but this dish was really excellent on its own merit, and did in fact taste like Indian, as opposed to my eggplant catastrophe a few weeks ago. Recap: I spent something like 3 hours in the kitchen making "Indian" eggplant (I substituted eggplant for meat in a recipe, go figure) which tasted afterward like funky Italian. John and I both agreed: it doesn't taste too bad, but if you spend 3 hours in the kitchen, you want it to taste like you spent 3 hours in the kitchen.

Today's recipe comes from Jamie Oliver. There are many recipes for chicken korma online, but this one looked especially terrific to me - promising in part due to its not skipping time-consuming steps like marinating overnight.

Note: I included some pictures below of the saffron rice we made. This is easy: steam rice until slightly underdone (this will depend on the quantity of rice. Look at the package and steam about 5-7 minutes less than the full cooking time.) Remove rice from heat. Sauté onion and spices (cumin, coriander - whatever you like) in ghee or oil until soft. Add soaked saffron water (first picture) and the onion-spice mixture to the rice and let steam until done. Add some raw snap peas and green onion.

Ingredients:

1.kg Chicken breast or mini breast fillets
1 heaped tablespoon of finely grated fresh ginger
3 cloves of garlic, minced
150g thick (plain) yogurt
1 dried red chili
2 finely chopped onions
1 tbsp ghee or veg. oil
1 tbsp ground coriander
Pinch of ground black pepper
1 tsp turmeric
1 tsp garam masala
water
75g creamed coconut
salt, to taste
2 heaped tbsps ground almonds
finely chopped Coriander Leaves, to garnish
juice of 1/2 lemon

Instructions:

1. Cut the chicken breasts into bite sized chunks
2. Mix the chicken with the ginger, garlic and yogurt. Cover and marinade for 12 hours or in the fridge overnight.
3. Liquidise the chopped onion and red chillies, add a little water if you need to. blend til smooth.
4. Heat the ghee/oil in a pan.
5. Add the ground coriander, ground black pepper, turmeric and garam masala and stir fry for about 1-minute over a low heat.
6. Turn up the heat, add the onion and chilli paste and stir fry for 10-minutes.
7. Add the chicken and the marinade and continue to stir fry for another 10-minutes.
8. Add the creamed coconut and enough water to *just* cover the chicken and bring to the boil, stirring until the coconut is dissolved. Stir in the ground almonds.
9. Reduce heat to low, cover the pan and simmer until the chicken is tender (30-40 minutes).
10. Remove from heat, add lemon juice and salt to taste. Mix well.

The one thing that we did in addition to the above was make our own garam masala. This is very easy, and will be its own blog post. John helped a lot in the kitchen...since there was a lot of prep.

Here are the pictures of our saffron rice and Korma:

S


Tuesday, March 23, 2010

Pâte à Choux


One morning, I felt like making something sweet and interesting for breakfast. Breakfast is our most ordinary meal of the week. We eat the same thing, really, every weekday morning - raw oats with ground flax seeds, walnuts, and honey that we make for ourselves since we have different morning schedules. That's a nice way of saying that I sleep in:) On weekends, usually on Saturday mornings after the farmer's market, John makes breakfast for us with fresh eggs that we pick up there - an omelet or just over-easy eggs with toast from bread baked that morning and purchased at the market. yum!
So this morning, I felt like making something dessert-like, who knows why! I want to make doughnuts soon, but with the ingredients on hand, I was able to make pâte à choux - pastry with filling inside. We used jam and chocolate as our fillings, but next time, I will definitely fill them with cream, the more traditional route. See below for some pictures of our very sweet breakfast. We enjoyed these with some strong coffee.

Tuesday, March 2, 2010

Mojadara

Post by Mom (from the shared blog days, enjoy:))
** Rumor has it that Pop has spent a good part of the day preparing the sour kraut post.... but he hasn't POSTED - so this is a victory - of sorts - as my food is ready, and the POST is completed.... while the cabbage is merely under the stone, without the luxury of internet confirmation....

_________________

Today's Post?  Starting now:

I try to think about cooking dinner at least 1 night a week - it is the least I can do, right? So tonight was the long awaited Mojadara, a recipe I learned to love while working (at Bell) in downtown Greensboro and eating at Zaytoon's.....

So tonight, after rashly committing to "cook" dinner, I prepared the rice, the lentils and then began the "caramelized" onion process....which to a non-cook seems like a big freaking deal.... slice onions and deep fry in hot oil until they "caramelize" which is to be contrasted with BURN to a crisp....


And after they are done, (which takes an amazingly long time) stir into the rice/lentil Mojadara.... and then cook batch number 2....


Man, these look great.....

then add.... into the pan.....


so..... it all came together pretty good...

 until the VERY end, when it was time to prepare the Taziki Sauce..... and it seemed that certain "man folk" from the Weber house had contrived to take the PLAIN yogurt that I had purchased, and turned it into some kind of Vanilla treat - - - leaving the sad, lonely cucumber for another day....


  but thats okay.... I still  beat the Sour-Kraut/crock post - and don't have to cook for another week...

all is well.


Friday, February 5, 2010

Amaranth Cakes with Wild Mushrooms

This dish is taken from The Vegetarian Times Cookbook. It is the earthiest, one of the richest dishes we have ever eaten - and, as the cookbook title makes obvious, completely meatless. If you are going to try this, carve out a nice time slot for yourself, make sure your spouse or dinner partners are patient and good souls, and keep a box of tissues and a masseuse on hand.

Here is the recipe:

Amaranth Cakes

2 cups boiling water
1/2 oz dried porcini mushrooms
1 cup amaranth seeds, rinsed
2 tbs minced shallot
1/4 tsp salt
1 large egg
2 tbs all-purpose flour
1 tbs finely chopped fresh marjoram
Olive Oil for frying
1 cup shaved Parmigiano-Reggiano

Mushroom mixture

2 tbs olive oil
1 lb wild mushrooms (I used a blend of cremini and oyster)
Salt and freshly ground black pepper to taste
2 tbs minced shallot
1 clove minced garlic
1/2 cup dry white wine
2 tbs unsalted butter
1 tbs coarsely chopped fresh marjoram

Make Amaranth cakes: pour boiling water over porcini and soak for 15 minutes. Lift mushrooms from water using slotted spoon and sieve out the sediment from the mushroom water. Reserve mushroom water to cook the amaranth. Rinse mushrooms well and chop finely. Set aside.

Place amaranth, shallots, salt, mushrooms, and 1 1/2 cups of mushroom liquid in saucepan, and heat over medium heat. Cover, and reduce heat to very low. Cook for 25 minutes, or until amaranth absorbs all liquid. Transfer to a bowl and let cool. Be sure it is lukewarm before you pour in the egg or the egg will cook. Stir in the egg, flour and marjoram.

Make mushroom mixture: heat oil in large skillet over medium-high heat. Add mushrooms, season with salt and cook, tossing from time to time, until mushrooms release moisture and begin to brown. Add shallots and garlic, cook for 1 minute more and add wine. Continue to cook until only a few tablespoons of liquid remain. Stir in butter and marjoram, and transfer to a bowl or saucepan. Keep warm while making the cakes.

Ok - here is the tricky part. You are basically making pancakes. It can be frustrating since mine actually totally fell apart on my first try so John heard a mini-fit take place, and then I dropped an egg on the floor. SO..try to not expect these pancakes to stick perfectly. My suggestion is try another egg for extra measure: pour some olive oil into skillet, and heat over medium heat. When oil is hot, drop 2 tbs portions of amaranth batter, and flatten with fork into pancake shape. Cook until browned on bottom, about 1 minute, flip (haaa!!! - I mean, good luck), and brown the top. Repeat with remaining batter, take deep breaths and remember they will taste just fine broken, and pancake away until your batter is gone.

Alternate layers of amaranth cakes and mushrooms on individual serving plates or large platter. Top with shaved Parmigiano-Reggiano cheese, and serve immediately. This was gratifying and fun for me, since making the stupid cakes turned me into a burning wreckage.

I actually would make this again, having learned my lesson on the pancakes, because the flavor is absolutely mind-blowing...if you love mushrooms that is!

Here are some pictures of the process (the good parts):


Sunday, January 31, 2010

Whole Roasted Fish with Crushed Potatoes and Charmoula

This recipe has been in my favorites box on Epicurious for some time. We finally made it last week! It was excellent...my first foray into cooking whole fish (including eyeballs, which we did not eat). It was very satisfying, although rather tedious at times avoiding little bones.

The charmoula, the cilantro sauce, was terrific. I have to say I have learned something about fennel - I had never roasted fennel before, but it was one of the most unique flavors I have ever experienced. Now that we have tasted roasted fennel with olive oil, along with fennel seeds, in potatoes with some preserved lemon, I think we will cook it again and again as a side-dish.

The recipe can be found above, in five components - roasted fish, lime yogurt, chermoula, potatoes, and roasted fennel.

Here are some pictures of our dinner:


Saturday, January 23, 2010

Moroccan Beef Tagine

For Christmas of last year, Pop gave John and me our first ever authentic Moroccan tagine. Our culinary gift collected dust for about 3 weeks until we broke it in with the following. (The original recipe called for lamb, but since we had purchased some wonderful beef stew meat, we used that instead.)


I found a great site for Moroccan food and went to work.

I will insert the recipe here in a few days. The site is taking forever to load.

One note on the recipe - the apricots added a great deal of sweetness to the dish. The flavors were very nice, but the dish was slightly sweet for John's and my taste. The orange juice, while a nice touch, seemed to add nothing to the dish in terms of flavor; maybe food science has something to do with its inclusion in the recipe.

Sautéing the onions in olive oil


The tagine with all the ingredients prior to simmering


Simmering:)


Posted by Sara