Just an update - the boys are changing more and more every day. Charles is trying to stand up without support - he lets go of his support with one hand and tries to balance. Most of the time, he ends up sitting on the floor although we have seen him balance precariously in a standing position for about 0.1 seconds maybe twice.
Joseph is still creeping around, but he's getting faster and is realizing there is a multitude of interesting items across the threshold of the living room, where he has spent most of the last 8 months of his life. Recent discoveries - the water jugs in the kitchen, the laundry basket in the kitchen, and the view from underneath the kitchen table.
Both boys are laughing and smiling a lot these days and are very interactive. Their interaction is more purposeful now, I think - trying to express specific wants through their intonations instead of just crying and me trying to guess what the crying means.
Love these cartoon pictures of the babies - Mom did them but I am posting them.
Last night for dinner - hamburger omelet. I love omelets for dinner since they are 1) fast 2) tasty 3) cheap 4) make for easy cleanup.
Last night for the boys' dinner - ground grassfed beef and broccoli. I have discovered the boys love meat...they just love food in general. They eat more than I realized they would at this stage which is fine, just takes a bit more planning on my part. Raising whole foods babies is not cheap and it takes some extra time to prepare their meals, but that's ok. I think they are learning to appreciate good food.
I have introduced so far with great success: acorn squash, apples, avocado, bananas, beef (grass-fed only), butter, broccoli, butternut squash, cauliflower, carrots, chicken (broth mixed with vegetables and chicken liver), egg yolk (duck and chicken), garlic (only spice introduced so far besides mineral salt), mineral salt (pink Himalayan rock salt - just a bit over certain foods), pear, parsnip, peas, potato, sweet potato.
They loved everything except for the cauliflower, but I think it's because I prepared it wrong, so we will try again soon.
Plan to introduce in the near future - ground lamb, beets, slight amounts of paprika and ginger as seasonings. I have looked for organic apricots and peaches but they are out of season so haven't had luck with that so far.
That's all for now :-)
Wednesday, December 14, 2011
Wednesday, December 7, 2011
Ode to John
In celebration of our third year, three candles on the table! We celebrated our anniversary with a spread of favorite treats from Trader Joe's - smoked salmon, crackers, cheese, olives, lady fingers, wine.
Neglected to take enough pictures, but did manage the candles.
Tuesday, November 22, 2011
Saturday, November 19, 2011
Shepherds Pie
Tonight, we made Shepherds Pie for the first time. I won't post the recipe because I think I will hunt around a bit more to see what other recipes are out there. It turned out pretty well - we used ground beef from Creekside Farms, and although John prefers lamb in his Shepherds Pie, the beef was very tasty!
We overdid it a bit in our casserole dish so no pictures this time - we were supposed to use a 9x9 dish, and only had an 8x8 in the cabinet, so our pie was delicious but not so photogenic.
Today was a very busy day. We got our highchairs, finally! After a lot of highchair shopping by me, the very picky mom, I finally selected the Keekaroo and so far I am very happy with the purchase. The boys seem to really enjoy sitting elevated above the ground (no more eating solids in their Bumbos!) more at our level, and they enjoyed talking with each other while next to each other in their chairs. The whole afternoon was devoted to assembling them and making sure the boys were comfortably seated, then it was quick errands to Earth Fare and Trader Joe's, then finally back to home base where we made dinner.
Really looking forward to worship tomorrow. All for now, to all a good night.
We overdid it a bit in our casserole dish so no pictures this time - we were supposed to use a 9x9 dish, and only had an 8x8 in the cabinet, so our pie was delicious but not so photogenic.
Today was a very busy day. We got our highchairs, finally! After a lot of highchair shopping by me, the very picky mom, I finally selected the Keekaroo and so far I am very happy with the purchase. The boys seem to really enjoy sitting elevated above the ground (no more eating solids in their Bumbos!) more at our level, and they enjoyed talking with each other while next to each other in their chairs. The whole afternoon was devoted to assembling them and making sure the boys were comfortably seated, then it was quick errands to Earth Fare and Trader Joe's, then finally back to home base where we made dinner.
Really looking forward to worship tomorrow. All for now, to all a good night.
Wednesday, November 16, 2011
Shakshuka
Last night, we cooked Shakshuka with Spinach and Feta, adapted from Janna Gur's The Book of New Israeli Food. The recipe called for sautéed leeks, but we substituted half a white onion and it turned out well. Shaksuka is one of my favorite dishes from Israel, but usually it's cooked in tomato sauce. I thought this book did a great job creating a tomato-less version. This is not exactly the book's recipe, but it's close.
For our version, you need:
About 6 ounces feta cheese, cut into cubes
One bunch organic spinach, chopped
1/2 organic white onion, sliced
6 free range eggs butter
1 clove organic garlic
Salt and green pepper to taste
Preparation:
In a deep pan with a lid, sauté onion until soft. Add spinach and garlic and sauté until soft. Blend ingredients well and spread around the pan. Crack 6 eggs on top of your spinach mixture, spread the feta around the pan, and turn heat to low. Put the lid on the pan and steam until egg whites are done. Season with salt and pepper (we used green peppercorns). Careful with the time so you don't cook the yolks completely...unless of course you like them that way. Shakshuka is supposed to have soft yolks and cooked whites. We enjoyed our shakshuka with red wine and flax oat bran bread =)
Sunday, November 13, 2011
Visit to St. Patricks
Tonight, we visited the East side church plant of our home church, King of Kings called St. Patrick's. It is a home church for now, but with full evening service and communion. It was the first time we had taken the boys out at night and it went really well. The boys did great! We had to leave a bit earlier than we would have preferred simply due to poor planning on our part but next time we will make sure we have a place for them to sleep in case we want to stay longer. My Messianic background has familiarized me with liturgical services to the point where I am very comfortable using a prayer book. John's experience in the Messianic movement was less liturgical, but he also has a Catholic background - long story - which makes him more familiar with the order of service in an Anglican church than I am. I have been struck by the parallels in Anglican liturgy to some of the Jewish liturgy that I am more familiar with, particularly the "Holy Holy Holy" portions of the prayer book. In the Jewish tradition, we lift our heels off the floor during "Kadosh Kadosh Kadosh" symbolizing with our bodies our reaching toward God's holiness. I don't notice the same bodily reflection in the Anglican church, but the words are similar. Of course the liturgies share sources and thus commonalities.
For dinner we enjoyed baked potatoes, very quickly consumed on our way out the door to feed our ravenous boys. John's potato waited until we were actually at home, since he held both babies so I could get some dinner, thanks honey;)
We also had some good red wine during dinner, which I was able to enjoy while nursing the boys in the back of the house at the end of service. =)
Saturday, November 12, 2011
Enjoying a Warm Fire
Tonight we made our first fire of the winter season. Of course, it qualifies as the first fall fire, too, since we haven't built a fire since last year. So, we're enjoying the crackling sound and earthy smell of our real wood fire. We had leftover soup tonight with more of the bread and some Cabernet that mom bought us on her last visit down here. We felt like it had a smoky finish (Smoking Loon, perhaps the origin of the name?) but then again we were pretty close to the fire. Praying Charles sleeps better tonight. He's given us two full nights of sleep in the past month. I'm not sure if he needs extra food or extra comfort at this stage, maybe a little bit of both. Either way, we need wisdom in dealing with his frequent night wake-ups that have kept both of us pretty tired during the day. That's about it for now! John is cleaning up the last bit of the kitchen before we head to bed.
Friday, November 11, 2011
John's in the kitchen...
Well, John is in the kitchen prepping for dinner. Tonight, we'll be enjoying soup - Lentil and Broccoli cream soup. We've never tried that but had some homemade chicken broth from when I made chicken curry salad last week and had to find something to do with it! So, soup it is. Perfect on a cold night like this - supposed to dip to 30 degrees. John stopped by Great Harvest Bread Company on his way home and bought some really tasty-looking whole grain bread, so we'll have that with some butter along with our soup tonight and some wine. Only additions needed are a good fire in the fireplace, which we should have soon!
John has been handling a lot of the dinner end of things lately, since I'm the baby-feeder of the house, a job which I gladly assume.
It's nice to be able to sit together in the evenings and enjoy dinner and a glass of wine, since that is basically our time together. Then,
we feed the boys one last time between 9 and 9:30 and they go to bed for...hopefully the rest of the night! Joseph is our good sleeper; Charles is our active little guy and we're working on him a bit more.
Tuesday, September 6, 2011
Blog Happenings...or Finally an Update
So those of you who have been following "What's Cooking" have probably stopped following since nothing new has been posted since November! Well here is a new post, finally, but which has nothing to do with cooking. I've decided to re-think this entire blog and along with a new design come some new thoughts. Originally this was intended to be a family blog - kind of a compilation of everyone's activities in the kitchen. Since I am the only one who has really been posting (except for a couple by you, mom, kudos!:)) I feel a sense of ownership and desire to change things up a bit. I'm going to be the only one posting from now on - and including posts having nothing to do with culinary activity.I'm re-thinking the name, too. The URL will stay "home artisans," but the header most likely will change from "What's Cooking" to something a bit less kitchen-specific:) We shall see.
Above you'll see the picture of our new additions...the beautiful reasons I haven't updated in so long! Introducing Charles and Joseph, now almost 5 months old! Full names are Charles Frederick and Joseph Benjamin. Charles is on the left, Joseph is on the right.
More updates to come, as I figure out what I want this blog to become.
Friday, November 5, 2010
Thai Basil Chicken or Gai Pad Gra Pow

This is a family favorite. We like to cook it at least once a month at our house (preferably much more often!). Originally, this recipe came from Thaitable. We modify their recipe slightly.
YOU NEED:
2 TBS Vegetable Oil
4 - 7 Thai chili peppers, minced
1 TBS sugar
1 - 2 packages fresh Thai basil
1/2 lb chicken, minced
1 TBS garlic, minced
1 carrot, thinly sliced
a wok is preferable for cooking this dish
Jasmine rice
For sauce:
juice of 1 lemon
equivalent amount of fish sauce
4 or 5 minced Thai chili peppers
We modify the above in the following way: we usually double everything! While this is not true modification so far, we also typically add a bit more garlic than is called for, more Thai chili peppers (at least 10), and 1 - 2 TBS oyster sauce. Occasionally, we add 1 - 3 sliced Asian eggplants right before we add the chicken. We also add a Thai basil curry paste to the ground chicken and let it marinate a few minutes.
PREP
Make your sauce by mixing sauce ingredients above in a small bowl. Set aside.
Mince the garlic and chili pepper. Put in a small bowl together or separate. Set aside.
Thinly slice your carrot (and eggplant, if using) and place in a large bowl. Set aside.
Clean and pick your basil leaves. Pile onto a plate. Set aside.
Measure your sugar, fish sauce, and oyster sauce if using into a small bowl and set aside.
Mince your chicken.
Ingredients should be assembled. We add eggplant to ours as well (if you do this, add it before the chicken and stir a few minutes.)
COOKING!
Fry garlic and chili pepper in oil over high heat.
When garlic begins to brown, add eggplant (if using) and carrot. Stir-fry eggplant a few minutes until softens (add more oil as needed). If only using carrot, proceed immediately to the next step.
Drop chicken in and stir constantly. Keep stirring until all juice is out of chicken and chicken is cooked.
Add sugar, fish sauce, and oyster sauce. Stir fry for a few seconds.
Add Thai basil. Turn it over in the wok to mix through the dish. It will wilt and smell wonderful.
Plate over jasmine rice. Serve with lemon-fish sauce and enjoy!
PICS of the Cooking Process:


Tuesday, October 19, 2010
Bi Bim Bap

Yes, it's been since June since the last post! I'll be trying to blog regularly from now on since those first three months of pregnancy are over and the nausea has subsided enough for me to return to the kitchen.
I wanted to post about my favorite Korean dish - Bi Bim Bap. Bi Bim Bap is frequently served in a hot stone bowl, in which case it would be called Dol Sot Bi Bim Bap.
It's an extremely nutritious dish - full of vegetables, with anchovies and egg as protein, served over rice. Most people eat it with a semi-sweet, slightly spicy, red pepper paste.
I'm giving the recipe for our easy home-made version. You will find many variants of this recipe, since Bi Bim Bap can really be made with a variety of vegetables, depending on your preference and what is in your fridge. In that way, it can be economical and a great way to use up raw vegetables while they are still fresh. And since this recipe is so centered around vegetables, they need to be the freshest!
Our basic recipe for two calls for:
3 or 4 carrots, julienned
One package small mushrooms (baby bellas cut into fourths or enoki mushrooms are good choices)
1 package spinach, washed
2 cups jasmine rice
myulchi bokkeum (stir-fried dried anchovies)
Korean red pepper paste
1/2 Cup soy sauce
2 Tbs Sesame oil
2 or 3 Pinches Sesame seeds
One package sliced green onion
2 eggs
For Myulchi Bokkeum (thank you, Maangchi!):
1 cup dried anchovies, 1 tbs olive oi, 1 or 2 tbs sugar, 1/2 tsp minced garlic, 2 tsp water, and 1/2 tbs corn syrup (Optional. We use canola oil instead and it turns out great!). Follow recipe through the link above - it's very easy and delicious.
1. First, put your rice on to steam in your rice cooker or pan.
2. Mix soy sauce, sesame oil, and sesame seeds in a small bowl. Add 3 tablespoons of chopped green onion. Set aside.
3. Make myulchi bokkeum, following Maanchi's recipe above.
4. Blanch your vegetables one at a time: carrots, spinach, and mushrooms. (You can also fry your mushrooms for a few minutes in 1 or 2 tbs sesame oil for stronger flavor).
5. Arrange blanched vegetables on a plate along with the extra sliced green onion.
6. Sprinkle some sesame seeds over your mushrooms. Drizzle vegetables with a small amount of sesame oil if you like.
7. Fry two eggs (we use the same pan used for the mushrooms without washing it first).
8. Fill your bowls with rice. Arrange your bi bim bap as desired - the vegetables go on top of the rice, spoon a little of the soy sauce blend over the veggies, and top each bowl with your fried egg. You can either mix your anchovies into the dish or eat them on the side. Add Korean red pepper paste to taste throughout the meal.
Enjoy!
Wednesday, June 23, 2010
Garam Masala

Prepping for last post's Korma, John and I made garam masala ourselves. You can purchase garam masala in the store pre-ground, but it usually has nowhere near the pungency you can create by making your own. In fact, when we smelled our finished masala, the difference was so great that we just dumped our store-bought spice.
I think garam masala is very fun to make - it is visually appealing, with all of your spices laid out to roast, and the aromas of the roasting spices are delicious. John ground the roasted spices in the mortar and pestle and then we mixed in a pinch of saffron.
There are different versions of garam masala, but most include the following basic spices. Sometimes recipes call for saffron or rose petals. Our recipe called for saffron.
Here are the ingredients you need:
2 tablespoons cumin seeds
2 tablespoons coriander seeds
2 tablespoons cardamom seeds
2 tablespoons black peppercorns
1 (3-inch) stick cinnamon, broken up
1 teaspoon whole cloves
1 teaspoon grated nutmeg
1/2 teaspoon saffron (optional)
Now, toast all of the spices except for the nutmeg and saffron. Do this by putting them into a dry, heavy skillet (we used cast iron) set on medium-high heat. Be careful and watch the spices. They should give off a slight smoke as they roast and the aroma will be sweet and spicy. If you burn them at all, you will need to start completely over. The flavors will be full-bodied after about 10 minutes of toasting, with some variance depending on the type of stove you are using.

After the spices are toasted, grind them to a powder along with the nutmeg and saffron in either a spice grinder, or, as we used, a mortar and pestle.

It should keep from 3 - 4 months in a tightly-sealed container away from heat and light.
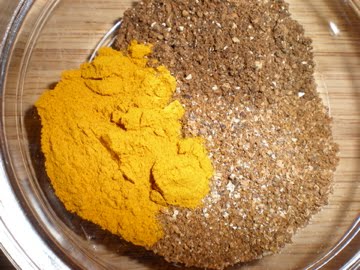
The spice on the right is the garam masala; the spice on the left is turmeric.
Posted by Sara.
Tuesday, June 15, 2010
Chicken Korma with Saffron Rice

If you have been checking this blog for updates, you may have noticed that not much has been cooking lately. This is more a reflection of my laziness with respect to blogging than actual inactivity in the kitchen. We have been cooking more simple meals lately, such as vegetables with vegetables...nothing particularly photogenic.
So, moving on to today's recipe: Chicken Korma. I have still not been able to reproduce exactly the taste of this dish at our favorite Indian restaurant, but this dish was really excellent on its own merit, and did in fact taste like Indian, as opposed to my eggplant catastrophe a few weeks ago. Recap: I spent something like 3 hours in the kitchen making "Indian" eggplant (I substituted eggplant for meat in a recipe, go figure) which tasted afterward like funky Italian. John and I both agreed: it doesn't taste too bad, but if you spend 3 hours in the kitchen, you want it to taste like you spent 3 hours in the kitchen.
Today's recipe comes from Jamie Oliver. There are many recipes for chicken korma online, but this one looked especially terrific to me - promising in part due to its not skipping time-consuming steps like marinating overnight.
Note: I included some pictures below of the saffron rice we made. This is easy: steam rice until slightly underdone (this will depend on the quantity of rice. Look at the package and steam about 5-7 minutes less than the full cooking time.) Remove rice from heat. Sauté onion and spices (cumin, coriander - whatever you like) in ghee or oil until soft. Add soaked saffron water (first picture) and the onion-spice mixture to the rice and let steam until done. Add some raw snap peas and green onion.
Ingredients:
1.kg Chicken breast or mini breast fillets
1 heaped tablespoon of finely grated fresh ginger
3 cloves of garlic, minced
150g thick (plain) yogurt
1 dried red chili
2 finely chopped onions
1 tbsp ghee or veg. oil
1 tbsp ground coriander
Pinch of ground black pepper
1 tsp turmeric
1 tsp garam masala
water
75g creamed coconut
salt, to taste
2 heaped tbsps ground almonds
finely chopped Coriander Leaves, to garnish
juice of 1/2 lemon
Instructions:
1. Cut the chicken breasts into bite sized chunks
2. Mix the chicken with the ginger, garlic and yogurt. Cover and marinade for 12 hours or in the fridge overnight.
3. Liquidise the chopped onion and red chillies, add a little water if you need to. blend til smooth.
4. Heat the ghee/oil in a pan.
5. Add the ground coriander, ground black pepper, turmeric and garam masala and stir fry for about 1-minute over a low heat.
6. Turn up the heat, add the onion and chilli paste and stir fry for 10-minutes.
7. Add the chicken and the marinade and continue to stir fry for another 10-minutes.
8. Add the creamed coconut and enough water to *just* cover the chicken and bring to the boil, stirring until the coconut is dissolved. Stir in the ground almonds.
9. Reduce heat to low, cover the pan and simmer until the chicken is tender (30-40 minutes).
10. Remove from heat, add lemon juice and salt to taste. Mix well.
The one thing that we did in addition to the above was make our own garam masala. This is very easy, and will be its own blog post. John helped a lot in the kitchen...since there was a lot of prep.
Here are the pictures of our saffron rice and Korma:
S
Tuesday, March 23, 2010
Pâte à Choux

One morning, I felt like making something sweet and interesting for breakfast. Breakfast is our most ordinary meal of the week. We eat the same thing, really, every weekday morning - raw oats with ground flax seeds, walnuts, and honey that we make for ourselves since we have different morning schedules. That's a nice way of saying that I sleep in:) On weekends, usually on Saturday mornings after the farmer's market, John makes breakfast for us with fresh eggs that we pick up there - an omelet or just over-easy eggs with toast from bread baked that morning and purchased at the market. yum!
So this morning, I felt like making something dessert-like, who knows why! I want to make doughnuts soon, but with the ingredients on hand, I was able to make pâte à choux - pastry with filling inside. We used jam and chocolate as our fillings, but next time, I will definitely fill them with cream, the more traditional route. See below for some pictures of our very sweet breakfast. We enjoyed these with some strong coffee.

Tuesday, March 2, 2010
Mojadara
Post by Mom (from the shared blog days, enjoy:))
** Rumor has it that Pop has spent a good part of the day preparing the sour kraut post.... but he hasn't POSTED - so this is a victory - of sorts - as my food is ready, and the POST is completed.... while the cabbage is merely under the stone, without the luxury of internet confirmation....
_________________
Today's Post? Starting now:
I try to think about cooking dinner at least 1 night a week - it is the least I can do, right? So tonight was the long awaited Mojadara, a recipe I learned to love while working (at Bell) in downtown Greensboro and eating at Zaytoon's.....
So tonight, after rashly committing to "cook" dinner, I prepared the rice, the lentils and then began the "caramelized" onion process....which to a non-cook seems like a big freaking deal.... slice onions and deep fry in hot oil until they "caramelize" which is to be contrasted with BURN to a crisp....
And after they are done, (which takes an amazingly long time) stir into the rice/lentil Mojadara.... and then cook batch number 2....
until the VERY end, when it was time to prepare the Taziki Sauce..... and it seemed that certain "man folk" from the Weber house had contrived to take the PLAIN yogurt that I had purchased, and turned it into some kind of Vanilla treat - - - leaving the sad, lonely cucumber for another day....
but thats okay.... I still beat the Sour-Kraut/crock post - and don't have to cook for another week...
_________________
Today's Post? Starting now:
I try to think about cooking dinner at least 1 night a week - it is the least I can do, right? So tonight was the long awaited Mojadara, a recipe I learned to love while working (at Bell) in downtown Greensboro and eating at Zaytoon's.....
So tonight, after rashly committing to "cook" dinner, I prepared the rice, the lentils and then began the "caramelized" onion process....which to a non-cook seems like a big freaking deal.... slice onions and deep fry in hot oil until they "caramelize" which is to be contrasted with BURN to a crisp....
And after they are done, (which takes an amazingly long time) stir into the rice/lentil Mojadara.... and then cook batch number 2....
Man, these look great.....
so..... it all came together pretty good...
but thats okay.... I still beat the Sour-Kraut/crock post - and don't have to cook for another week...
all is well.
Friday, February 5, 2010
Amaranth Cakes with Wild Mushrooms
This dish is taken from The Vegetarian Times Cookbook. It is the earthiest, one of the richest dishes we have ever eaten - and, as the cookbook title makes obvious, completely meatless. If you are going to try this, carve out a nice time slot for yourself, make sure your spouse or dinner partners are patient and good souls, and keep a box of tissues and a masseuse on hand.
Here is the recipe:
Amaranth Cakes
2 cups boiling water
1/2 oz dried porcini mushrooms
1 cup amaranth seeds, rinsed
2 tbs minced shallot
1/4 tsp salt
1 large egg
2 tbs all-purpose flour
1 tbs finely chopped fresh marjoram
Olive Oil for frying
1 cup shaved Parmigiano-Reggiano
Mushroom mixture
2 tbs olive oil
1 lb wild mushrooms (I used a blend of cremini and oyster)
Salt and freshly ground black pepper to taste
2 tbs minced shallot
1 clove minced garlic
1/2 cup dry white wine
2 tbs unsalted butter
1 tbs coarsely chopped fresh marjoram
Make Amaranth cakes: pour boiling water over porcini and soak for 15 minutes. Lift mushrooms from water using slotted spoon and sieve out the sediment from the mushroom water. Reserve mushroom water to cook the amaranth. Rinse mushrooms well and chop finely. Set aside.
Place amaranth, shallots, salt, mushrooms, and 1 1/2 cups of mushroom liquid in saucepan, and heat over medium heat. Cover, and reduce heat to very low. Cook for 25 minutes, or until amaranth absorbs all liquid. Transfer to a bowl and let cool. Be sure it is lukewarm before you pour in the egg or the egg will cook. Stir in the egg, flour and marjoram.
Make mushroom mixture: heat oil in large skillet over medium-high heat. Add mushrooms, season with salt and cook, tossing from time to time, until mushrooms release moisture and begin to brown. Add shallots and garlic, cook for 1 minute more and add wine. Continue to cook until only a few tablespoons of liquid remain. Stir in butter and marjoram, and transfer to a bowl or saucepan. Keep warm while making the cakes.
Ok - here is the tricky part. You are basically making pancakes. It can be frustrating since mine actually totally fell apart on my first try so John heard a mini-fit take place, and then I dropped an egg on the floor. SO..try to not expect these pancakes to stick perfectly. My suggestion is try another egg for extra measure: pour some olive oil into skillet, and heat over medium heat. When oil is hot, drop 2 tbs portions of amaranth batter, and flatten with fork into pancake shape. Cook until browned on bottom, about 1 minute, flip (haaa!!! - I mean, good luck), and brown the top. Repeat with remaining batter, take deep breaths and remember they will taste just fine broken, and pancake away until your batter is gone.
Alternate layers of amaranth cakes and mushrooms on individual serving plates or large platter. Top with shaved Parmigiano-Reggiano cheese, and serve immediately. This was gratifying and fun for me, since making the stupid cakes turned me into a burning wreckage.
I actually would make this again, having learned my lesson on the pancakes, because the flavor is absolutely mind-blowing...if you love mushrooms that is!
Here are some pictures of the process (the good parts):


Here is the recipe:
Amaranth Cakes
2 cups boiling water
1/2 oz dried porcini mushrooms
1 cup amaranth seeds, rinsed
2 tbs minced shallot
1/4 tsp salt
1 large egg
2 tbs all-purpose flour
1 tbs finely chopped fresh marjoram
Olive Oil for frying
1 cup shaved Parmigiano-Reggiano
Mushroom mixture
2 tbs olive oil
1 lb wild mushrooms (I used a blend of cremini and oyster)
Salt and freshly ground black pepper to taste
2 tbs minced shallot
1 clove minced garlic
1/2 cup dry white wine
2 tbs unsalted butter
1 tbs coarsely chopped fresh marjoram
Make Amaranth cakes: pour boiling water over porcini and soak for 15 minutes. Lift mushrooms from water using slotted spoon and sieve out the sediment from the mushroom water. Reserve mushroom water to cook the amaranth. Rinse mushrooms well and chop finely. Set aside.
Place amaranth, shallots, salt, mushrooms, and 1 1/2 cups of mushroom liquid in saucepan, and heat over medium heat. Cover, and reduce heat to very low. Cook for 25 minutes, or until amaranth absorbs all liquid. Transfer to a bowl and let cool. Be sure it is lukewarm before you pour in the egg or the egg will cook. Stir in the egg, flour and marjoram.
Make mushroom mixture: heat oil in large skillet over medium-high heat. Add mushrooms, season with salt and cook, tossing from time to time, until mushrooms release moisture and begin to brown. Add shallots and garlic, cook for 1 minute more and add wine. Continue to cook until only a few tablespoons of liquid remain. Stir in butter and marjoram, and transfer to a bowl or saucepan. Keep warm while making the cakes.
Ok - here is the tricky part. You are basically making pancakes. It can be frustrating since mine actually totally fell apart on my first try so John heard a mini-fit take place, and then I dropped an egg on the floor. SO..try to not expect these pancakes to stick perfectly. My suggestion is try another egg for extra measure: pour some olive oil into skillet, and heat over medium heat. When oil is hot, drop 2 tbs portions of amaranth batter, and flatten with fork into pancake shape. Cook until browned on bottom, about 1 minute, flip (haaa!!! - I mean, good luck), and brown the top. Repeat with remaining batter, take deep breaths and remember they will taste just fine broken, and pancake away until your batter is gone.
Alternate layers of amaranth cakes and mushrooms on individual serving plates or large platter. Top with shaved Parmigiano-Reggiano cheese, and serve immediately. This was gratifying and fun for me, since making the stupid cakes turned me into a burning wreckage.
I actually would make this again, having learned my lesson on the pancakes, because the flavor is absolutely mind-blowing...if you love mushrooms that is!
Here are some pictures of the process (the good parts):


Subscribe to:
Posts (Atom)